How to Wire a Ceiling Fan With Light and Dimmer Switch
5 Ways to Wire and Install a Ceiling Fan
Installing and wiring a ceiling fan is a very basic task even a beginner can easily connect a ceiling fan to the household wiring connection. As lots of complex ceiling fan wiring diagrams are available on the internet, we will try to show the very basic connections of fans with fuse box.
We will be showing the different methods of a ceiling fans connection i.e.
- Ceiling Fan with Speed Regulator and Single Way Switch.
- Ceiling Fan and Light Switch with Fan Speed Regulator and Light Dimmer Switch controlled by a common Single ways switch.
- Ceiling Fan control by single way switch and dimmer and light control by SPST switch.
- Ceiling Fan control by Pull Chain / String and Light Control by SPST Switch.
- Ceiling Fan with Remote Control and Receiver Wiring connection
Note: The wiring colors in this tutorials are for illustration and clarification only i.e. these colors used in this guide is only for guidance and do not necessarily represent regional variance. See the bottom notes for US and EU Wiring color codes (NEC and IEC). In addition, some manufactures may use different wire colors, this way follow the regional color coding or check the user manual guide for clear explanation. If still not sure, contact a licensed electrician for proper installation.
Disclaimer: This diagrams(s) are to be used as a guide only. Use of this guide is at the installer risk. We Electrical Technology and the author of this guide accept no liability for injury, loss or damage resulting from use of this guide. For proper installation, you may contact the licensed electrical. Read carefully the safety precaution at end of this guide.
- Related Post: How to Size and Find the Numbers of Ceiling Fan in a Room?
First of all, switch off the main circuit breaker to disconnect the power supply before beginning the wiring installation of a ceiling fan. Each methods has been explained with step by step guide and related diagrams.
Wiring a Ceiling Fan with Single Way Switch & Speed Regulator Switch
In this tutorial, we will wire and connect the ceiling fan to the power supply and control it through single way switch which further control the fan speed by dimmer or speed control regulator switch.
To to this, follow the following instructions:
- Ground / Earth Wire: Connect the Green / Yellow wire from the fan to the Green / Yellow from the distribution board which is further connected to grounding / earthing wire.
- Neutral Wire: Connect the black wire from the ceiling fan to the incoming neutral wire.
- Line, Live or Phase Wire: Connect the incoming red phase wire to the SPST (single pole single through) switch and further to the fan speed regulator switch i.e. both single way switch and fan speed controller or dimmer switch is in series. Finally, connect the the live i.e. red wire from the fan to the dimmer switch. This way, single way switch, dimmer switch and fan are connected in series through live wire. The fan is connected to the power supply now which 120V AC in US and 220V in UK and EU.
- Use wire caps for bare conductors and joints and tuck the wires back in the box.
- You can now turn on the main circuit breaker switch to test the fan with different speeds by turning and rotating the fan dimmer switch.

The following is is the same wiring diagram as dimmer switch and single way switch are enclosed in a combined box.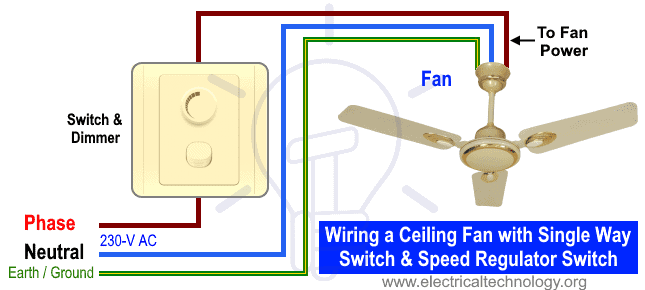
- Related Post: How to Connect and Install a Capacitor with a Ceiling Fan?
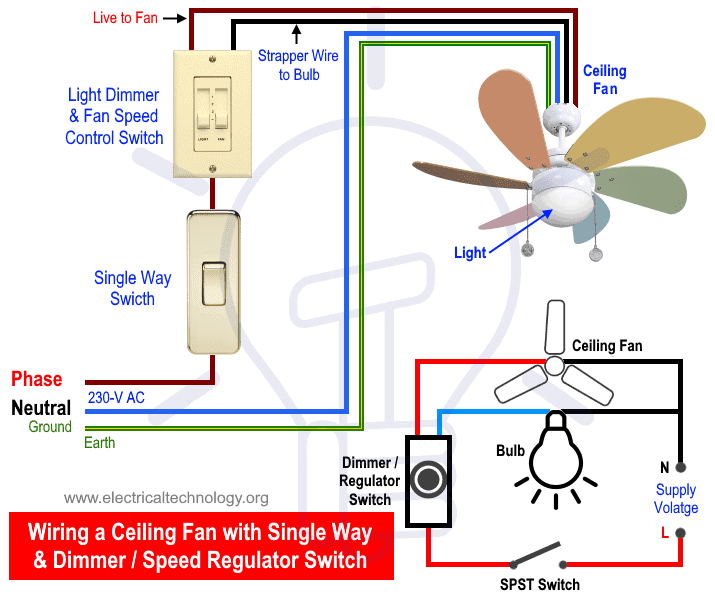
Wiring a Ceiling Fan & Light with Speed Regulator and Light Dimmer Switch Controlled by a Common SPST Switch
In this case, we have four wires from the ceiling fan. The red wire as live to fan, the blue wire as live to the light bulb, the black wire as neutral and green / yellow as ground wire.
A single way switch controls both the light dimmer switch and fan speed control regulator switch in this circuit as shown follow. To do this, follow the instructions below:
- First of all, connect the green/ yellow as a ground wire to the incoming ground / earth wire.
- Now, connect the black wire as neutral to the incoming neutral from main DB.
- Connect the incoming red as live wire to the single way switch. The other end of the SPST switch should be connected to the combine dimmer and speed regulator switch. Now connect the upper left end of the regulator switch to the red wire of fan and connect the upper right end of the dimmer to the blue wire of light.
- Use wire caps for joints and bare conductor and pull back the wires in the box and turn on the main switch to check the light and speed of fan and bulb by rotating both the fan and light dimmer switches.
You can also use separate light dimmer switch for bulb and speed control regulator for ceiling fan as follow.
- Related Post: Single Phase Electrical Wiring Installation in Home – NEC & IEC
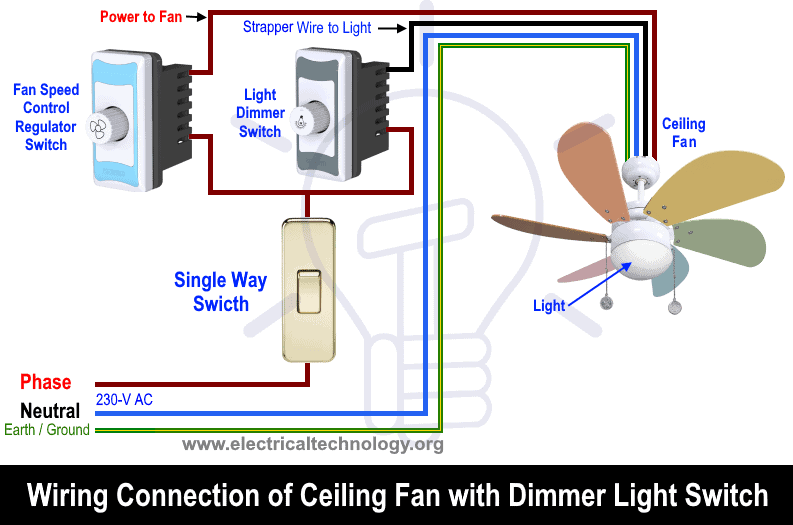
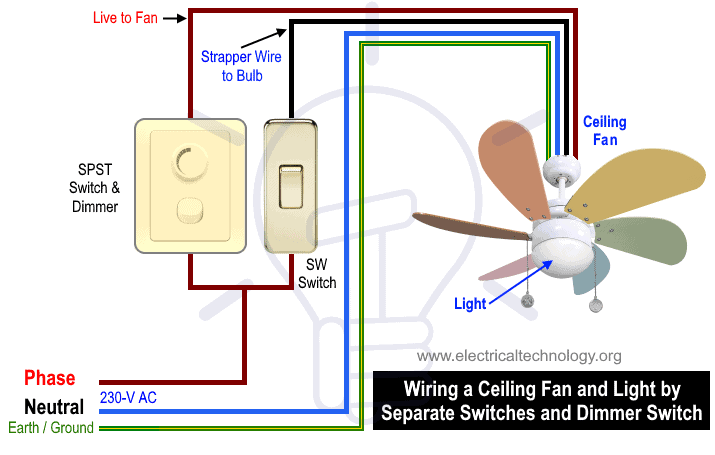
Wiring a Ceiling Fan and Light by Separate Switches and Dimmer Switch
In this wiring tutorial, We will be controlling the ceiling fan by single way switch and dimmer switch while the light bulb will be control by separate switch. To do so, see the following instructions:
- As mentioned above, connect the green / yellow wire from the fan to the ground wire from main board.
- Now connect the black wire from the fan as neutral to the black neutral from distribution board.
- Connect the red wire as live to the combo of single way switch and fan speed regulator ( same enclosed box where single way and regulator switch are in series). A joint (use wire nut) from the incoming live (red) should be taken and connect to the separate single way switch which is for light ON/OFF control. The red wire from the fan should be connected to the single way switch and fan speed dimmer switch while the blue should be connected to the separate single way switch for light control.
- Use wire caps for joints and bare conductor and pull back the wires in the box and turn on the main switch to check the light and speed of fan by rotating the fan speed dimmer switch.
- Related Post: Three Phase Electrical Wiring Installation in Home – NEC & IEC
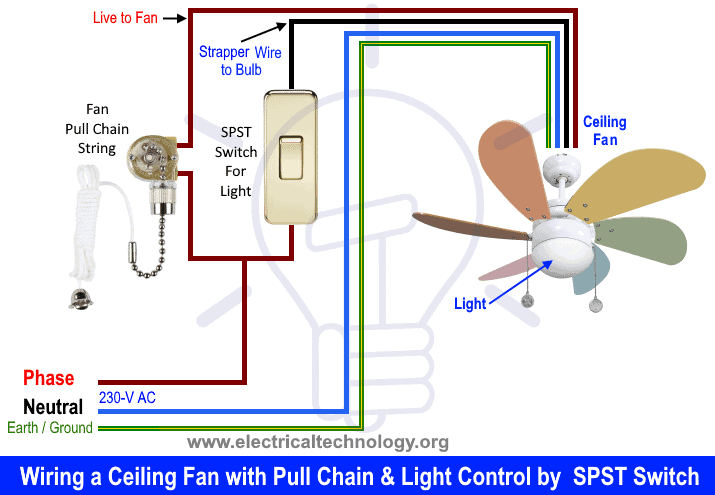
Wiring a Ceiling Fan with Pull Chain & Light Control by Separate SPST Switch.
In this scenario, we will control the ceiling fan speed by pull chain / string switch and light bulb by separate single way switch. To to this wiring, see the following steps.
- Connect the Green / Yellow Wire as ground wire from the fan to the household earth wire.
- Connect the black wire from the fan to the household main distribution neutral wire.
- Connect the red wire as line from the fan to the upper end of pull chain. The lower end of the pull string switch should be connected to the line from main distribution board. With the help of wire nut, a joint can be taken from the incoming line and should be connected to the single way switch which further connected to the blue wire of ceiling fan.
- Use wire caps for joints and bare conductor and pull back the wires in the box and turn on the main circuit breaker to check the light and speed of fan by pulling the chain string.
- Related Post: Single Phase Electrical Wiring installation in a Multi-Story Building
Wiring a Ceiling Fan with Remote Control & Receiver
In this wiring connection, you can control a ceiling fan (ON/OFF and speed control) through remote control or smartphone by installing a receiver with antenna at the fan box. If you have a builtin light bulb in fan, you can control both of them remotely otherwise, only fan can be connected to the receiver terminals.
To control a ceiling fan through remote, follow the following wiring instructions:
- First of all, turn off the main breaker to disconnect the power supply.
- Now connect the green / yellow wire to the ground wire from household DB board.
- There are three outgoing and two incoming wires in the receiver. In case of builtin light bulb in the fan, connected the blue wire from the fan to the blue in the receiver. Do the same i.e. black to black (neutral) and red to red (live) from the fan to the receiver and then to the incoming supply wires through a series single way switch as shown follow.
- Insert the batteries in the remote and turn on the main breaker to provide the power supply and check as things should work as expected.

- Related Post: Three Phase Electrical Wiring Installation in a Multi-Story Building
NEC and IEC Wiring Color Codes:
We have used Red forLive orPhase ,Black forNeutral and Green / Yellow for Earth Wire. You may use the specific area codes i.e. IEC – International Electrotechnical Commission (UK, EU etc) orNEC (National Electrical Code [US & Canada] where;
NEC:
Single Phase 120V AC:
- Black =Phase orLine
- White =Neutral
- Green / Yellow=Earth Conductor
Three Phase 208 AC:
- Black =Phase 1orLine 1
- Red =Line 2
- Blue = Line 3
- White / Gray = Neutraland
- Green / Yellow = Earth Conductor
IEC:
Single Phase 230V AC:
- Brown =Phase orLine
- Blue =Neutral
- Green=Earth Conductor
Three Phase 208 AC:
- Grey =Phase 1orLine 1
- Black =Line 2
- Brown = Line 3
- Blue = Neutral
- Green= Earth Conductor
Related Post: How to Control One Lamp From Two or Three Places?
Safety Precautions
- Electricity is our enemy, if you give it a chance to kill you, Remember, they will never miss it. Please read all caution and instruction while doing this tutorial in practical.
- Disconnect the power source before servicing, repairing or installing electrical equipment.
- Use the proper cable in size with this simple calculation method ( How to determine the suitable size of cable for Electrical Wiring Installation)
- Never try to work on electricity without proper guidance and care.
- Work with electricity only in presence of those persons who has good knowledge and practical work and experience who know how to deal with electricity.
- Read all the instruction and cautions and follow them strictly.
- Doing your own electrical work is dangerous as well as illegal in some areas. Contact the licensed electrician or the power supply company before practicing any change in electrical wiring connection.
- The author will not be liable for any losses, injuries, or damages from the display or use of this information or if you try any circuit in wrong format. So please! Be careful because it's all about electricity and electricity is too dangerous.
In the above ceiling fan wiring installation tutorial, we showed five methods to wire a ceiling fan and will add more wiring tutorials in the future. If you know a specific method to do so, let us know in the comment box below.
Related Posts:
- Electrical Wiring Installation Diagrams & Tutorials
- How to Wire a Distribution Board with RCD
- How to Connect a Portable Generator to Home Supply System
- Staircase Wiring Circuit Diagram – How to Control a Lamp from 2 Places by 2-Way Switches?
- How to Control One Lamp From Two or Three Places?
- Manual & Auto UPS / Inverter Wiring Diagram with Changeover Switch
How to Wire a Ceiling Fan With Light and Dimmer Switch
Source: https://www.electricaltechnology.org/2019/11/ceiling-fan-wiring-installation.html